
Having a basic template for weekly planning can really help make the whole process easier. It enables you to record all the important aspects of the preschool week on one piece of paper. This way, there aren’t any nagging questions like, “Am I forgetting something this week?” While you may not get to every little aspect during the week, at least the days are mapped out. This is always helpful to us, as feeling prepared helps a lot with a teacher’s mindset!
What Is a Lesson Plan Template?
A lesson plan template can be used to create lesson plans. This means that you’ll have to follow certain steps to make sure that your students learn effectively. If you want to know more about how to use a lesson plan template, read on!
First of all, you need to understand the difference between a lesson plan template and a lesson plan. A lesson plan template is just the basic outline for creating a lesson. You can easily change the details, but you won’t be able to add any content. On the other hand, a lesson plan is much more detailed.
You should also note that a lesson plan template isn’t a set of instructions for making a specific type of lesson. Instead, it’s a general guide for planning lessons.
There are many different ways that you can use a lesson plan template. For example, you might want to use one to help you create a curriculum for your class. Or, you could simply use it to get started with teaching.
If you’re looking for a way to organize and structure the information in your classroom, then you may want to consider using a lesson plan template.
The Benefits of Using a Lesson Plan
When you have a class, it’s important to know how to teach effectively so that your students understand the information that you’re trying to impart. If you don’t use a lesson plan, then you may be missing out on the opportunity to help your students learn.
A good lesson plan template will give you an idea of what you need to include in order to make sure that your lessons are effective. You can also save yourself time by creating a new one each year instead of starting from scratch every term. This means that you won’t waste any more than necessary.
You should start with a short introduction, and then move into the main points of your course. Once you’ve covered all of these things, you’ll want to end on a strong note. For example, you could conclude your lesson with a question that requires your students to write down their answers in response to it.
You can even go beyond this basic structure. There are many different ways to create a lesson plan, but the most common way is to divide up your teaching in terms of topics or units.
You might decide to introduce a topic in the first week, spend a few weeks covering that particular concept, and then finish off with a final exam at the end of the unit.
What to Include in Your Lesson Plan
Your lessons need to be interesting. You want students to learn more than just facts and figures. So you should make sure that your lessons have a personal touch. That means that they need to contain information that is relevant to the lives of the students.
You also need to consider the needs of the students when creating your lesson plans. For example, you might use different activities depending on whether the class consists of children or teenagers. If you’re teaching younger kids, then you can use games and puzzles. However, you could try using worksheets and other hands-on activities for older students.
It’s important to keep in mind that your lesson plan doesn’t always need to follow a strict schedule. The key is to create a lesson that will help the students understand the material. This is why you should spend some time thinking about what you’re going to teach before you write your lesson plan.
What to Look for in a Good Lesson Plan
A lot of students don’t know how to write an effective lesson plan. However, this doesn’t mean that you can just wing it when writing your lessons. This article will help you figure out what makes a great lesson plan.
If you want to make sure that you’re able to get the most from your classes, then you should follow these steps:
1. Start by brainstorming. You need to be creative, but you also have to keep in mind the standards of the class. If you can’t come up with any ideas, then it might be time to consider hiring someone else to create a lesson plan for you.
2. Write down your goals. Make a list of the things that you hope to accomplish when you teach your class. Don’t forget to include all of the details.
3. Keep the outline short. When you’re writing your lesson plans, try to keep them to no more than one page.
4. Include the materials and resources that you will use. If you aren’t familiar with certain websites, then you may not realize how important they are.
5. Use visuals. In addition to creating a written lesson plan, you should also provide visual aids.
How to Make a Good Lesson Plan
A great way to get your students excited about learning is by making them feel like they’re part of the process. If you want to learn how to create an effective lesson plan, then this article can help. This guide explains why creating good lesson plans is important, as well as what you should include when planning lessons for your class.
It’s easy to forget that the main purpose of a lesson plan isn’t just to teach information. The goal of any lesson plan is to motivate and inspire your students. You need to use creative strategies to do this.
Here are a few tips for writing better lesson plans. First, you should always start with a problem that needs to be solved. Then, you can break down the steps needed to solve that problem. Finally, you’ll need to assign each step of the solution to one student.
You may also have to write several versions of your lesson plan. For example, you might decide to give your students different assignments based on their strengths and weaknesses. Or, you could divide your students into groups, so they all work together.
The last thing that you should consider when creating a lesson plan is whether or not it will take more than five minutes to complete. If you have a lot of material to cover, then the time limit shouldn’t matter.
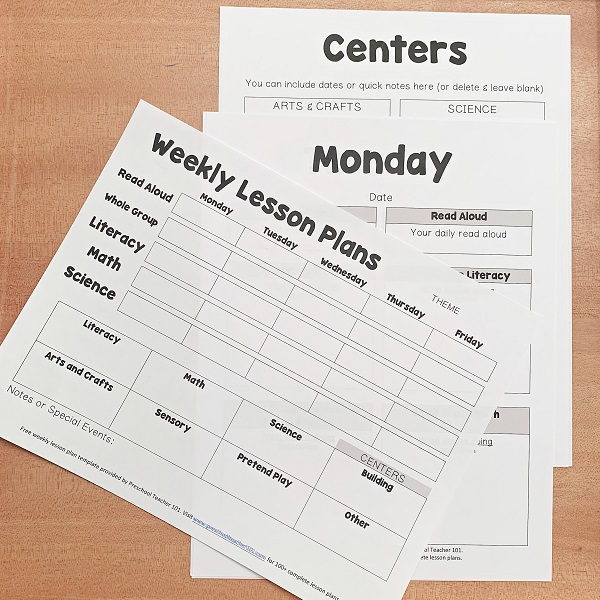
Step 1 – Choose the Best Template
Yes, this is a super basic first step! Isn’t it nice when things start out simply? We’ve put together a preschool lesson plan template for a variety of schedules. If your preschool students are there five days a week, grab that template. If you teach two days a week, there’s one for you too. I know there are even some teachers who teach three days with one age group and two days in another (in that case, I’d suggest using a 3-day template and a 2-day template). Hopefully, we’ve covered all the bases!
Pull up the template that suits you best and set the foundation for your planning. Add the theme up at the top of the page, and then be sure to enter your dates. Since the lesson plan template is editable, you can add this directly on the computer. You can change the dates to your preferred format, specify a theme, add notes and reminders, include different types of centers, and add specific lesson ideas.
Step 2 – Consult Your Monthly Plans
Those monthly plans you worked so hard on are going to come in handy. Either print them out or have them open on your computer. We often find it helpful to have the monthly notes printed out next to use as we draft the weekly plans on the computer.
While you’re looking at your monthly plans, ask yourself these questions:
- Which lessons can naturally be grouped together? For example, if you’re planning an apple theme – have the children taste test apples one day and then graph their favorites the next. Or have those activities grouped together on the same day.
- Which ideas have similar materials? If there are a few ideas that require the same materials, it’ll be easier for you to prep them all during the same week.
- How long will these tasks take? This will help you decide how long you allocate for the various lesson ideas.
Step 3 – Consider Read Aloud Titles
Now you’re ready to block out a week’s worth of activities at a time! We like to do each week in the month at the same time, if possible. That way, the plans are ready a month in advance and we can focus on the daily ins and outs of teaching. If that’s not your preference, that’s okay! Then you can plan each week at your convenience.
Add in the book titles that you plan on reading aloud every day to the preschool lesson plan template. If you’re anything like us, you’ll be reading more than one book each day to the preschool kids. Having one title written down for special circle time reading is always helpful, though.
Step 4 – Add Whole Group Lessons
Then move on to whole group activities, and add in some of the ideas from your monthly outline. Be sure to consider your age group when determining what goes here. Don’t plan for giant chunks of time, as that just isn’t reasonable when it comes to preschoolers. Whole group activities could consist of literacy, science, math, music, or movement activities. You could also schedule in class meetings during this time every so often. As the year progresses, how you use this time is likely to change, and that’s perfectly okay.
Step 5 – Plan for Small Groups
Once you have the week’s whole group lessons planned, proceed to the small group activities. You might lead small group activities while the children engage in independent centers. Or perhaps you have a dedicated small group time when you and your teaching assistant work with the children.
While the preschool lesson plan template has five spaces each for literacy, math, and science, please note that you don’t need to fill up all of them. If you’re the only teacher in the classroom, you will want to have just one of those filled in each day. Maybe one day your focus will be literacy, while the next will have a math focus.
Some teachers might not work with planned small groups at all, choosing instead to meet with the children at their center activities. This is perfectly fine, too. If that’s the case, perhaps you want to use this area of the template for recording a focus each day for literacy, math, and science.
Our goal was just to ensure ample planning room for a wide variety of preschool teachers. They’re your lesson plans – use them as you see fit.

Step 6 – Record Center Activities
Center activities are meant to be independent for the majority of your preschool classroom. This is the time when the children explore concepts you’ve already introduced. They can interact with their peers and work on those incredibly important social skills.
Be sure to consider how long you want each center activity available for the children. Will your home center be a spaceship for one week, or maybe two? Do you think the discovery bottles in the science center will engage the children for more than one week? Oftentimes, young children like to attend to the same activities over and over. This helps them practice important skills, and they often learn a new aspect of the task each time.
We tend to plan for two or three activities in most of the centers, just in case. This way, if we need to swap out an idea mid-week we already have something in mind. As always, you need to plan for what works best in your classroom.
Step 7 – Put it All Together
Repeat steps 1 through 6 for each week in the month you’re planning for. Once you have a month’s worth of lesson plans, be sure to add everything to your teaching binder or lesson plan book. We like to give each month its own space in our planning books, with the monthly outline in front and each weekly plan following it. All that’s left now is your day-to-day preschool prep!
Our preschool lesson plan template is meant to be a blank canvas for all of your amazing weekly plans. Print it out and hand write your plans, or type everything on the computer before you print it out. Either way, we’re sure you’ll be doing amazing things with your preschool students.